
At Superlative Service, with over 30 years of irrigation and landscaping expertise in Houston, Spring, and San Antonio, we’re committed to helping you maintain an efficient, sustainable sprinkler system. A key maintenance task is adjusting your sprinkler heads, and the Rain Bird 5000 series rotor heads are our go-to for their precision and durability. Ideal for medium to large lawns with a coverage range of 25-50 feet, these rotors ensure even watering when properly adjusted.
In this guide, we’ll walk you through adjusting a Rain Bird 5000 series rotor, covering how to set the arc (rotation angle), adjust the radius (spray distance), and use the head’s unique features. Whether you have a standard 5000 or the 5000 Plus model, these steps will help you optimize your system for your Houston, Spring, or San Antonio landscape. Let’s get started!
Tools Needed
- Rain Bird rotor adjustment tool (or a small flathead screwdriver)
- Optional: Gloves for better grip
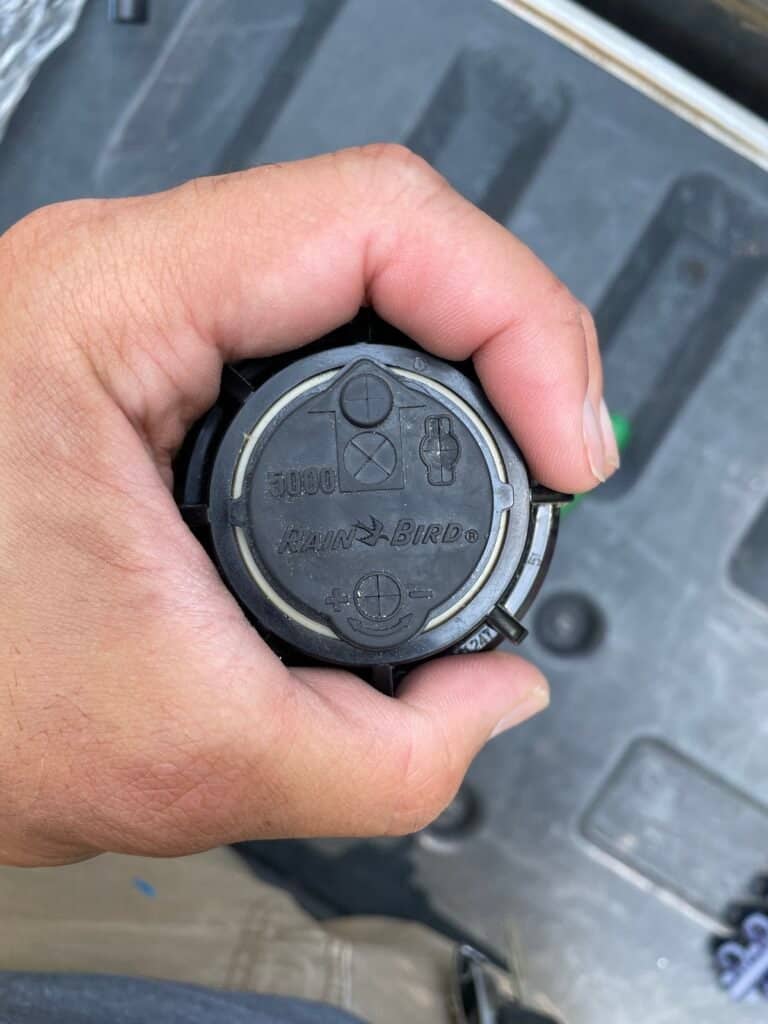
Understanding the Rain Bird 5000
The Rain Bird 5000 is a gear-driven rotor sprinkler head with a rubber cover on top, featuring three access points for adjustments:
- Radius Adjustment Socket: Located in the center of the arrow (indicating spray direction) above the nozzle housing, this slot adjusts the spray distance and secures the nozzle.
- Riser Lift Socket: A slot for lifting the riser assembly out of the body when the rotor is not in use.
- Arc Adjustment Socket: Marked with “+” and “-” icons, this slot adjusts the right-hand stopping point for the arc (40° to 360°).
The 5000 Plus model, identifiable by its green cover, includes an additional central socket to shut off water flow at the head, perfect for maintenance without turning off the entire zone.
The left-hand stop is fixed and cannot be adjusted with the tool, so it must be set manually before adjusting the arc or radius. Proper adjustments ensure water efficiency and healthy lawns, aligning with our sustainable landscaping mission.
Step-by-Step Guide to Adjusting a Rain Bird 5000 Sprinkler Head
1. Turn On the Sprinkler Zone
Activate the sprinkler zone containing the Rain Bird 5000 head you’re adjusting. This allows you to observe the current spray pattern and identify necessary changes. If your system has a controller, set it to run the specific zone manually.
2. Identify the Adjustment Points
Locate the three access points on the rubber cover of the sprinkler head:
- Radius Adjustment Socket: In the arrow above the nozzle housing, used to adjust spray distance or change the nozzle.
- Riser Lift Socket: Used to lift the riser assembly for maintenance when the rotor is off.
- Arc Adjustment Socket: Marked with “+” and “-” icons, used to adjust the arc’s right-hand stop.
If you have a 5000 Plus model (green cover), note the additional central socket for shutting off water flow at the head.
3. Set the Fixed Left-Hand Stop
The left-hand stop is the fixed starting point of the rotor’s rotation and must be set manually before adjusting the arc. To set it:
- With the sprinkler off or running, grip the nozzle turret (the top rotating part of the head) firmly.
- Rotate the turret clockwise all the way to the right until it stops, then rotate it counterclockwise to the left until it stops—this is the current left-hand stop.
- If the stop isn’t aligned with the desired left edge of your watering area (e.g., a lawn corner), continue rotating the turret counterclockwise past the current stop until it reaches the correct position.
For example, if the head is in a corner, align the left stop to spray along one boundary of your lawn. This ensures the rotor begins its rotation at the right point.
4. Adjust the Arc (Right-Hand Stop)
The arc controls how far the rotor rotates from the fixed left-hand stop to the right-hand stop, adjustable from 40° (a narrow wedge) to 360° (a full circle). To adjust:
- Turn the sprinkler zone on to observe the current arc.
- Rotate the turret clockwise to the right-hand stop to see if the arc needs to be increased or decreased, then return it to the left-hand stop.
- Insert the Rain Bird adjustment tool or a flathead screwdriver into the arc adjustment socket (marked with “+” and “-” icons) until it seats securely.
- To increase the arc (e.g., from 90° to 180°): Turn the tool clockwise toward the “+” icon. Each full turn adds approximately 90°.
- To decrease the arc (e.g., from 180° to 90°): Turn the tool counterclockwise toward the “-” icon. Each full turn reduces the arc by about 90°.
- Watch the rotor’s rotation to ensure it covers the desired area without spraying unwanted surfaces like sidewalks or fences.
Tip: Adjust in small increments (e.g., quarter-turns) to avoid over-correcting. The arc cannot go below 40°, so don’t force the tool beyond this limit.
5. Adjust the Radius (Spray Distance)

The radius determines how far the water sprays from the head, typically 25-50 feet depending on the nozzle and water pressure. To adjust:
- With the sprinkler running, insert the adjustment tool or flathead screwdriver into the radius adjustment socket (in the arrow above the nozzle housing).
- To decrease the radius (shorten the spray, e.g., to avoid a driveway): Turn the tool clockwise. This deflects the stream, reducing the throw by up to 25%.
- To increase the radius (extend the spray, e.g., to cover a larger lawn): Turn the tool counterclockwise to maximize the throw.
Note: If the radius cannot be adjusted to the desired distance, you may need to replace the nozzle with one designed for a different throw (e.g., 25 feet vs. 50 feet). Contact Superlative Service for assistance selecting the correct nozzle.
6. Use the Flow Shut-Off (5000 Plus Model Only)
If you have a Rain Bird 5000 Plus (green cover), you can shut off water flow at the head for maintenance or adjustments without turning off the entire zone:
- Insert the adjustment tool or screwdriver into the central socket on the rubber cover.
- Turn the tool to close the flow, allowing you to work on the head (e.g., clean the nozzle or lift the riser) without water pressure.
- Turn the tool back to reopen the flow when finished.
This feature is ideal for quick maintenance tasks and enhances the 5000 Plus’s versatility.
7. Lift the Riser for Maintenance (If Needed)

If the rotor is not in use and you need to access the riser assembly (e.g., to clean or replace the nozzle):
- Insert the adjustment tool into the riser lift socket.
- Give the tool a quarter-turn and pull upward to lift the riser out of the body.
- Perform any necessary maintenance, then push the riser back into place.
8. Test and Fine-Tune
Run the sprinkler zone for a few cycles to confirm the adjustments:
- Ensure the rotor starts at the fixed left-hand stop and rotates to the adjusted right-hand stop, covering the intended area.
- Verify the spray distance reaches the desired parts of your lawn without overshooting onto non-lawn surfaces.
- If needed, repeat steps 4 and 5 for minor tweaks to the arc or radius.
9. Turn Off the Zone
Once satisfied with the adjustments, turn off the sprinkler zone via the controller or manual valve. Your Rain Bird 5000 is now set for efficient watering!
Why Proper Adjustment Matters
Adjusting your Rain Bird 5000 sprinkler head ensures:
- Water Efficiency: Precise coverage reduces waste, supporting sustainable practices in Houston, Spring, and San Antonio.
- Lawn Health: Even watering prevents dry patches and overwatering, keeping your landscape lush.
- Cost Savings: Minimizing water waste lowers utility bills and conserves local water resources.
We recommend checking your sprinkler heads seasonally, as Texas’s extreme weather—from scorching summers to occasional freezes—can shift alignments over time.
Troubleshooting Tips
- No Rotation: Check for debris in the nozzle or a clogged filter. Lift the riser (Step 7) to clean or replace the nozzle.
- Uneven Spray: Ensure the head is level with the ground. If the radius is inconsistent, verify the nozzle matches your system’s pressure.
- Leaks Around the Head: Confirm the head is securely tightened to the riser or swing arm assembly. Persistent leaks may require professional inspection—contact us for help.
Why We Choose Rain Bird
Rain Bird 5000 series rotors are our preferred choice for their:
- Precision: Easy-to-use adjustment points allow accurate arc and radius settings.
- Durability: Built to withstand Texas’s tough climate, from intense heat to cold snaps.
- Versatility: Suitable for residential and commercial lawns, with features like the 5000 Plus flow shut-off for added convenience.
Need Expert Assistance?
Adjusting a Rain Bird 5000 is straightforward, but complex systems or persistent issues may benefit from professional expertise. Superlative Service specializes in irrigation solutions across Houston, Spring, and San Antonio. Call us for a system tune-up or to optimize your setup for maximum efficiency and sustainability!
By following these steps, you’ll keep your sprinkler system running smoothly and your lawn thriving. Happy irrigating!
Ready to optimize your irrigation system? Contact Superlative Service or call (281) 537-5579 for expert solutions tailored to your lawn.


