At Superlative Service, with over 30 years of irrigation expertise in Houston, Spring, and San Antonio, we know that a well-maintained sprinkler system is key to a lush, sustainable landscape. A common maintenance task is replacing a sprinkler head, whether it’s damaged, clogged, or outdated. In this guide, we’ll walk you through the process, share tips on choosing the right sprinkler head and nozzle, and detail how to install a swing arm assembly using funny pipe, Marlex, and barbed elbow fittings. We’ll also address why older systems with green or black nipple fittings should be upgraded.
Tools and Materials Needed

- Replacement sprinkler head (we recommend Rain Bird)
- Appropriate nozzle
- Funny pipe (polyethylene tubing, typically 1/2-inch)
- x2 Marlex street elbow fittings (1/2-inch for sprays or 3/4-inch for rotors)
- x2 Barbed elbow fittings (1/2-inch or 3/4 inch)
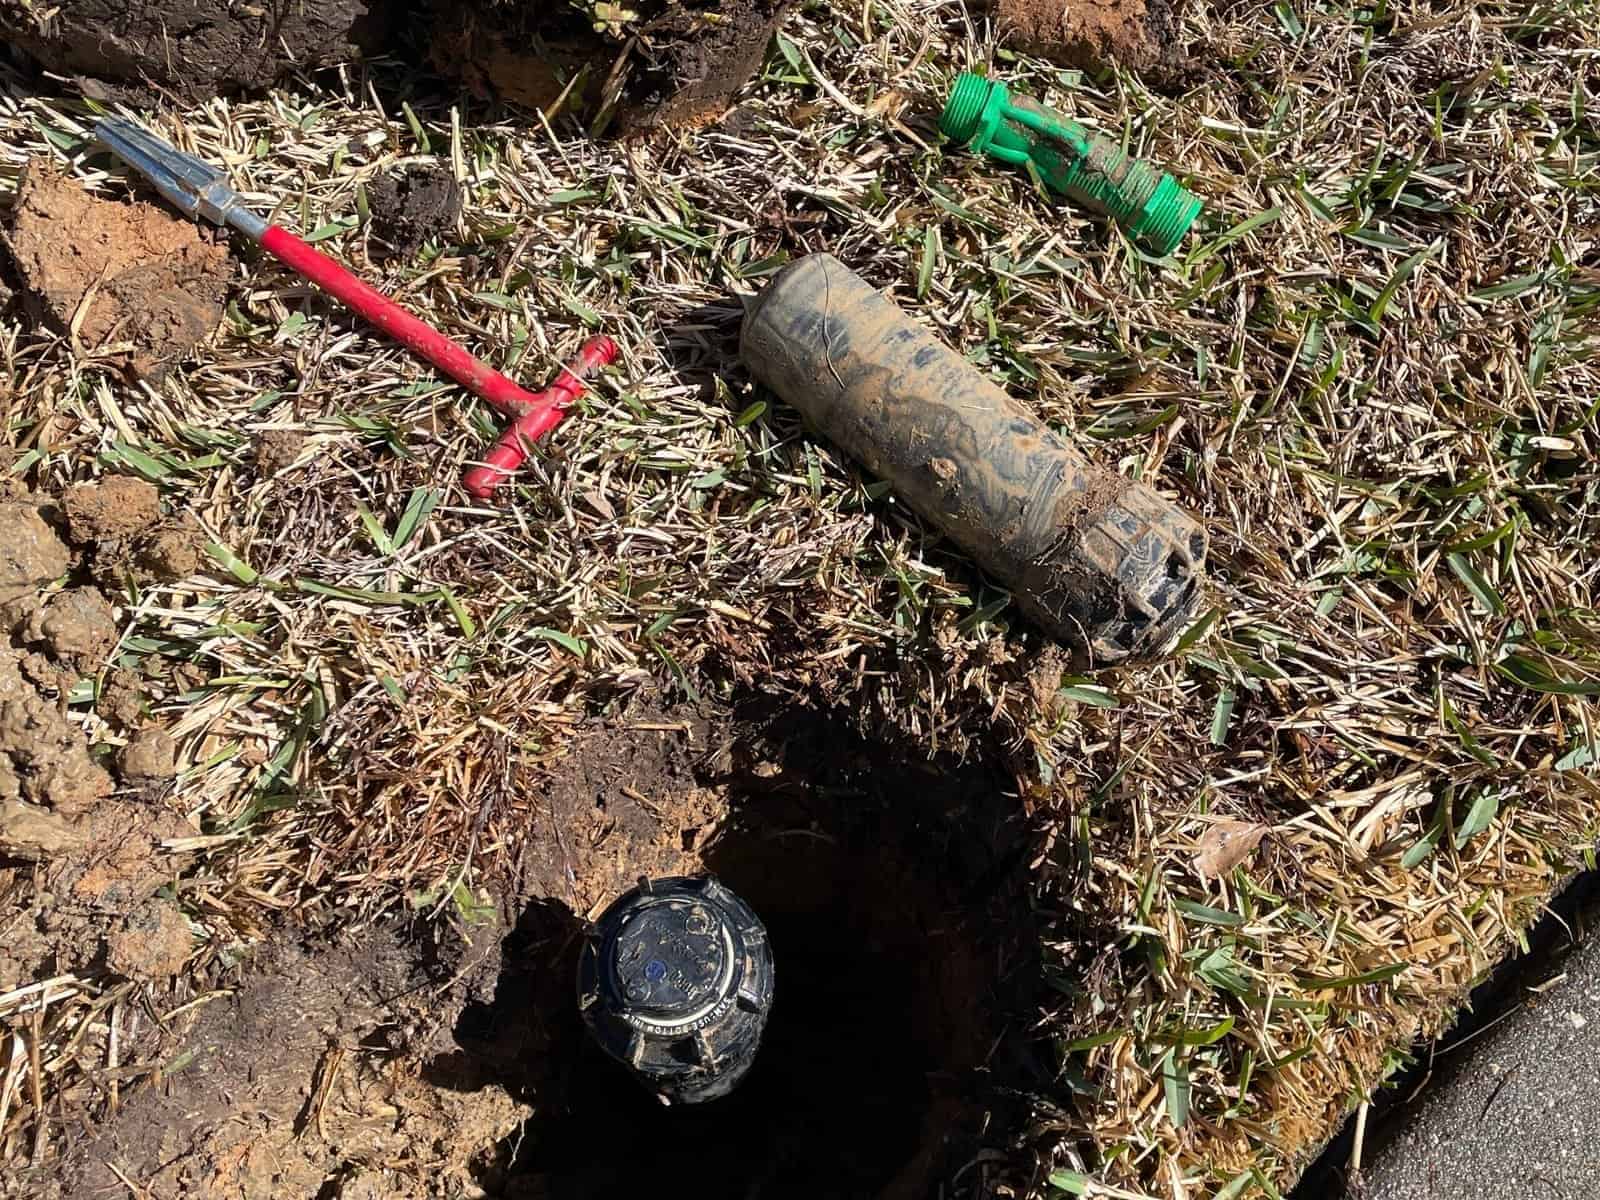
- Pipe cutter
- Shovel or trowel
- Rain Bird rotor tool
- Adjustable Pliers
- Nipple extractor (for older nipple fittings)
Step-by-Step Guide to Replacing a Sprinkler Head
1. Turn Off the Water Supply
Safety first! Locate your irrigation system’s main shut-off valve and turn off the water to avoid unexpected sprays. If your system has a controller, ensure it’s off or in “manual” mode.
2. Dig Around the Sprinkler Head
Carefully dig a small circle (about 6-8 inches in diameter) around the sprinkler head to expose the head and its connection to the lateral PVC pipe. Dig about 6 inches deep to access the riser or nipple. Place the soil on a tarp or black trash bag for less mess.
3. Inspect the Existing Setup
Check how the sprinkler head is connected. In older systems, you may find green or black nipple fittings (rigid PVC risers) directly attached to the pipe fitting. These are prone to breaking and limit adjustability, so we recommend replacing them with a swing arm assembly (more on this later).
4. Remove the Old Sprinkler Head

Unscrew the old sprinkler head counterclockwise by hand or with a pipe wrench if it’s stuck. If it’s attached to a green or black nipple, you’ll need to unscrew the entire nipple from the water line. For stubborn or broken nipple fittings, use a nipple extractor tool to grip and remove them without damaging the underground piping. Be careful to avoid harming the sprinkler pipe.
5. Identify the Right Sprinkler Head for the Zone
Before selecting a new sprinkler head, determine whether the zone requires a rotor or a spray head, as this affects water distribution and system performance. Check the existing heads in the zone:
- Spray Heads: These deliver a fixed, fan-shaped spray for smaller areas (5-15 feet radius), like flower beds or narrow strips. They use more water per minute and are ideal for compact areas.
- Rotor Heads: These rotate to cover larger areas (20-50 feet radius), like open lawns. They apply water more slowly, making them suitable for slopes or larger spaces.
Important: Never mix rotors and spray heads in the same zone. Rotors and sprays have different precipitation rates (the rate at which water is applied). Mixing them causes uneven watering—some areas will be overwatered, while others will be underwatered—leading to patchy lawns or wasted water. At Superlative Service, we prefer Rain Bird rotors (5000 series) and spray heads (1800 series) for their reliability.
Match the new head to the existing type in the zone (e.g., replace a rotor with a rotor). If you’re unsure, consult your system’s layout or contact us for a professional assessment.
6. Choose the Right Nozzle Distance

The nozzle determines the distance and pattern of water distribution, so selecting the correct throw distance is crucial for efficient watering. To choose the right nozzle:
- Measure the Coverage Area: Determine the distance from the sprinkler head to the farthest point you need to water. For example, a small flower bed might need a 5-8 foot throw, while a large lawn might require 20-30 feet.
- Match the Nozzle to the Distance: Rain Bird nozzles are labeled with their throw distance (e.g., 8 feet, 15 feet, 30 feet). Choose a nozzle that matches your measured distance to avoid overshooting (wasting water on sidewalks) or undershooting (leaving dry patches).
- Consider the Pattern: Select a nozzle with the appropriate arc for your area—quarter-circle (90°), half-circle (180°), or full-circle (360°)—based on the head’s location (e.g., corner, edge, or center of the zone).
- Check Zone Consistency: Ensure all nozzles in the same zone have similar precipitation rates for even watering. Rain Bird’s matched precipitation rate (MPR) nozzles simplify this by delivering consistent water output across different arcs and distances.
For rotors, you’ll need to choose the proper nozzle based on the flow (GPM). For Rain Bird rotors, the nozzles scale in sized based on their GPM, (a number 3 nozzle will distribute 3 gallons per minute).
Note: Blow out water through the head before attaching the new nozzle to remove an dirt that may have entered the pipe during the repair.
7. Install the New Sprinkler Head or Swing Arm Assembly

If your system uses a modern riser or swing arm, simply screw the new Rain Bird sprinkler head onto the existing riser. The threads of Marlex fittings and modern risers are self-sealing, so do not use Teflon tape, as it can interfere with the seal and cause leaks. Hand-tighten the head only–overtightening can cause the threads to warp too much.
If you’re dealing with an older green or black nipple fitting, you should upgrade to a swing arm assembly. These assemblies use flexible tubing or “funny pipe”, Marlex fittings, and barbed fittings to create a durable, adjustable connection that’s less likely to break.
How to Build a Swing Arm Assembly
A swing arm assembly allows the sprinkler head to “float” slightly, absorbing impacts and making height adjustments easier. Here’s how to build one:
- Cut the Funny Pipe: Measure and cut anywhere between 6-12 inch length of funny pipe (1/2-inch polyethylene tubing) using a pipe cutter. This flexible pipe acts as the backbone of the assembly.
- Attach Barbed Elbow Fittings: Insert a 1/2-inch barbed elbow fitting into each end of the funny pipe. Push and twist firmly to ensure a tight fit—no glue is needed, as the barbs create a secure seal.
- Connect to the Water Line: Screw a Marlex street elbow (male threaded on one end, female threaded on the other) into the underground water line where the old nipple was removed. The Marlex fitting’s threads are self-sealing, so do not use Teflon tape. Then, attach the female end of the Marlex elbow to one of the barbed elbows on the funny pipe. Depending on the pipe fittings orientation in the ground (vertical vs horizontal) Sometimes its much easier to assemble the entire swing arm, and then connect it to the pipe fitting in the ground.
- Attach the Sprinkler Head: Screw another Marlex street elbow into the other barbed elbow on the funny pipe. Then, attach the Rain Bird sprinkler head to the threaded end of this Marlex elbow. Again, avoid Teflon tape due to the self-sealing threads. Hand-tighten securely.
- Adjust Positioning: The funny pipe’s flexibility allows you to position the sprinkler head at the perfect height and angle. Ensure the head sits flush with the ground for optimal performance.
This setup is quick to install and far more resilient than rigid nipple fittings, especially in high-traffic areas.

8. Test the System
Turn the water supply back on and activate the sprinkler zone. Check for leaks and ensure the sprinkler head is functioning properly without overshooting onto sidewalks or driveways.
9. Final Adjustment of the Sprinkler Head
To ensure optimal water coverage, adjust the direction and spray pattern of your new Rain Bird sprinkler head. Whether it’s a spray head or rotor, precise adjustments prevent water waste and ensure your lawn gets even coverage.
To adjust a Rain Bird 1800 spray head, grip the stem fully extended and turn it to your desired position. You should hear a clicking noise during the adjustment, which is normal.
For detailed instructions on adjusting the arc, radius, and direction of the Rain Bird 5000 rotor click here. Follow the steps there to fine-tune your sprinkler’s performance.
10. Backfill and Clean Up
Once everything is working and adjusted, carefully backfill the hole with the reserved soil, tamping it down gently to avoid shifting the sprinkler head. If the soil is uneven, use a bag of sand or top soil to level out the grade.
Final Tips
- Always match the new sprinkler head type with the existing heads in the same zone to ensure uniform water distribution.
- Clean or replace clogged nozzles and filters rather than forcing water through them, as this can damage the head.
- If you’re unsure about your system’s setup or need professional help, contact Superlative Service or call (281) 537-5579. We specialize in upgrading and maintaining irrigation systems across Houston, Spring, and San Antonio.
By following these steps, you’ll keep your sprinkler system running smoothly and your landscape thriving. Happy irrigating!


